
Preparing your images for printing
Why is my image resolution too low for printing?
When you upload your images to an online image lab you need to meet their minimum size requirement. There are lots of different minimum sizes across all the print labs, so I’m not going to cover that now.
What you need to do is supply them with the largest size and resolution images you can produce.
So what can cause your images to be too small for printing?
Over cropping – cutting your photograph down too much during editing. Trying to save an image by zooming in on the subject and discarding the rest. This really isn’t zooming in, what you are actually doing is cutting off the unwanted parts.
So a 6000 x 4000 photo can quickly become a 1200 x 943 if you crop too much off. It might look good on your computer screen, but the print lab will limit the size of print you can order.
If you wanted a 24×36 canvas they would have to stretch your image beyond an acceptable amount. The pixels would start to look blocky and the end result would look awful.
The original 6000×4000 image is approximately 20”x13” in size. You could easily use an image of this size for 24×36 or bigger print.
In-camera image sizes
Digital cameras give you the option of saving your photos in large, medium, and small sizes, in both JPG and RAW formats. You should always shoot the largest possible images available.
I’ll use the Nikon D5300 as an example. It’s a 24-megapixel camera, Large images are 6000 x 4000, Medium is 4496 x 3000, and Small is 2992 x 2000. The Small image size of 2992 x 2000 is 8.5” x 6.6” and the Large is 20” x 13”.
By not choosing to shoot in the largest image size you are limiting what you can do with it. The larger image gives you more options after you crop it. Crop a small image down and you’ll only be able to print 4×6 photos.
Cropping images
When you are editing and want to crop the image down, remember not to crop too tight. You might want to get a print done and by over-cropping it might not fit the aspect ratio of the size of print you need.
For instance, a 5×7 has a different aspect ratio than an 8×10. The same rule applies when you are taking the photo. If you’re too tight to the subject it might restrict what size prints you can order. A great portrait might not look as good when the top of the subject’s head is cut off.
Color Profiles
The 2 color profiles you need to consider are sRGB and Adobe RGB (1998). sRGB is the default for computers, and Adobe RGB (1998) is popular with photographers and designers.
I use Adobe RGB (1998) because I use Adobe software. If you edit and save in Adobe RGB (1998) then set your camera to the same profile. The same goes for sRGB, you don’t want to shoot in sRGB and then switch to Adobe RGB.
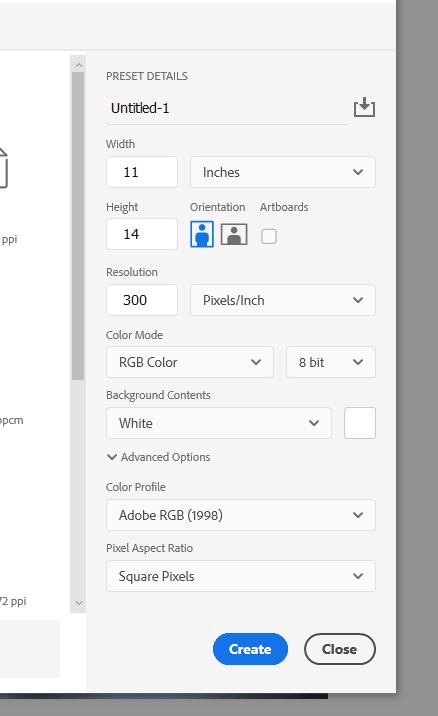
You also want to save in 8-bit not 16-bit. The industry standard is 8-bit for printing. You can work in 16-bit then save it as 8-bit. In Photoshop you can check by clicking “Image and then Mode”, the RGB Image and 8-Bit/Channel should be selected.
What is the correct DPI / PPI?
DPI (Dots Per Inch) and PPI (Pixels Per Inch) are the same. The dot and the pixel are the same things.
The number of pixels in each square inch of your image is really important when discussing the resolution. A 72 (dpi/ppi) image is fine for use online, but for printed work, you need 300 (dpi/ppi).
A large print that only has 72 (dpi/ppi) will look grainy and pixelated. So make sure all your images are 300 (dpi/ppi).
Monitor Calibration
Calibrating your monitor so it shows colors correctly is important. The first time you will realize this is when you get some prints back from the lab and the colors look off. The final product doesn’t match what you see on your monitor.
If the color reproduction isn’t too bad don’t worry about it for now. But if it’s way off you will need to calibrate your monitor. They start at around $190 for the Datacolor SpyderX Pro. They aren’t cheap but if it’s affecting your final product it might be necessary.
If you want to check out what the results will look like from the photo lab you have chosen, order some 5×7 or 8×10 prints before putting in a big expensive order. It’s better to be safe than sorry.
Sizing your images for printing
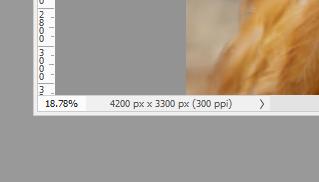
Rather than upload your photos to the processing lab and allow their software to resize and crop your work to fit a print size, do it yourself. Before I upload any images I decide what I’m going to order, then frame and size them in advance of uploading them. I do this in Photoshop. I know you can do all this in Lightroom, but I find it a bit easier in Photoshop, I’m stuck in my ways. Whichever software you use, make sure that the images you want to be printed are already sized. If you open your image in Photoshop you can see the size and dpi/ppi in the bottom left corner of the frame.
The best feeling
The best feeling for a photographer is holding a framed print of your work. Then delivering that piece to the customer and watching their reaction, it’s priceless.